
DAW guide
Bitwig Studio
PluginPie uses the included the PluginPie controller
extension to insert plug-ins and devices in Bitwig. The in-app setup guide walks you through installing
the extension, enabling Bitwig's copy device ID command, and
adding devices to PluginPie.
Open the in-app setup guide
PluginPie includes a guided Bitwig setup as part of its first-run experience. It installs or updates the controller extension, prepares the required Bitwig configuration, and shows where to add the controller.
To reopen the guide later, open PluginPie Settings, select Bitwig Studio, and choose Open Bitwig Studio Setup Guide.
Install the extension and config
Bitwig needs two pieces of setup: the PluginPie extension that receives PluginPie's insertion requests, and a Bitwig setting that makes device IDs available to copy.
1. Install the controller extension
PluginPie includes
PluginPie.bwextension. This is the bridge between
PluginPie and Bitwig's controller API.
- Quit Bitwig Studio completely.
- Open the Bitwig setup guide in PluginPie and choose Export PluginPie Controller.
-
In the folder picker, select the
Extensionsfolder insideDocuments/Bitwig Studio.
| macOS |
~/Documents/Bitwig Studio/Extensions/
|
|---|---|
| Windows |
%USERPROFILE%\Documents\Bitwig Studio\Extensions\
|
| Windows OneDrive |
%USERPROFILE%\OneDrive\Documents\Bitwig Studio\Extensions\
|
2. Enable Bitwig's device ID command
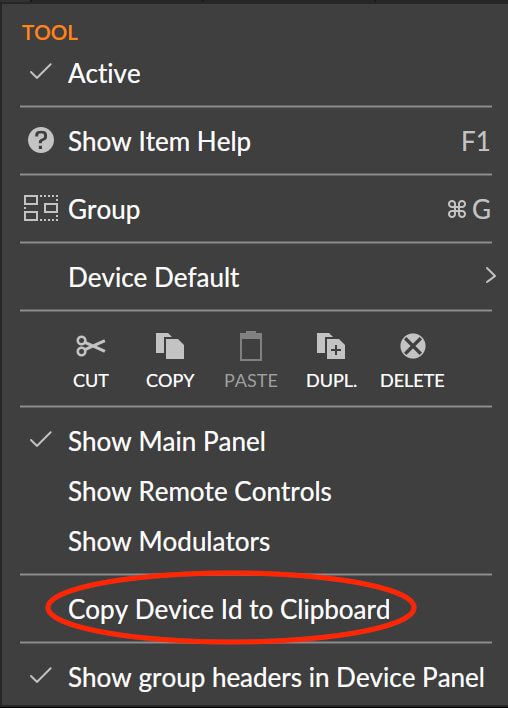
Bitwig's controller API requires a device ID to insert a plug-in. You can copy a device ID by right-clicking a device and choosing Copy Device Id to Clipboard. However, this command is hidden by default.
The command can only be exposed by placing a config.json file
with the line
can-copy-device-and-param-ids : true in the directory
listed below. PluginPie can do this for you automatically.
- Keep Bitwig Studio closed after exporting the extension.
- Choose Create / Update config.json in the Bitwig setup guide.
| macOS |
~/Library/Application Support/Bitwig/Bitwig Studio/config.json
|
|---|---|
| Windows |
%LOCALAPPDATA%\Bitwig Studio\config.json
|
How PluginPie handles config.json
| No existing config file (most likely) | PluginPie creates it with the required line. |
|---|---|
| Exact line present | PluginPie leaves the file unchanged. |
| Setting absent | PluginPie preserves the existing contents, creates a timestamped backup, and appends the required line. |
| Manual edit required | PluginPie leaves the existing file unchanged. This can happen if the config.json file is corrupted or formatted incorrectly. |
Add the PluginPie controller
- Reopen Bitwig Studio after both setup actions are complete.
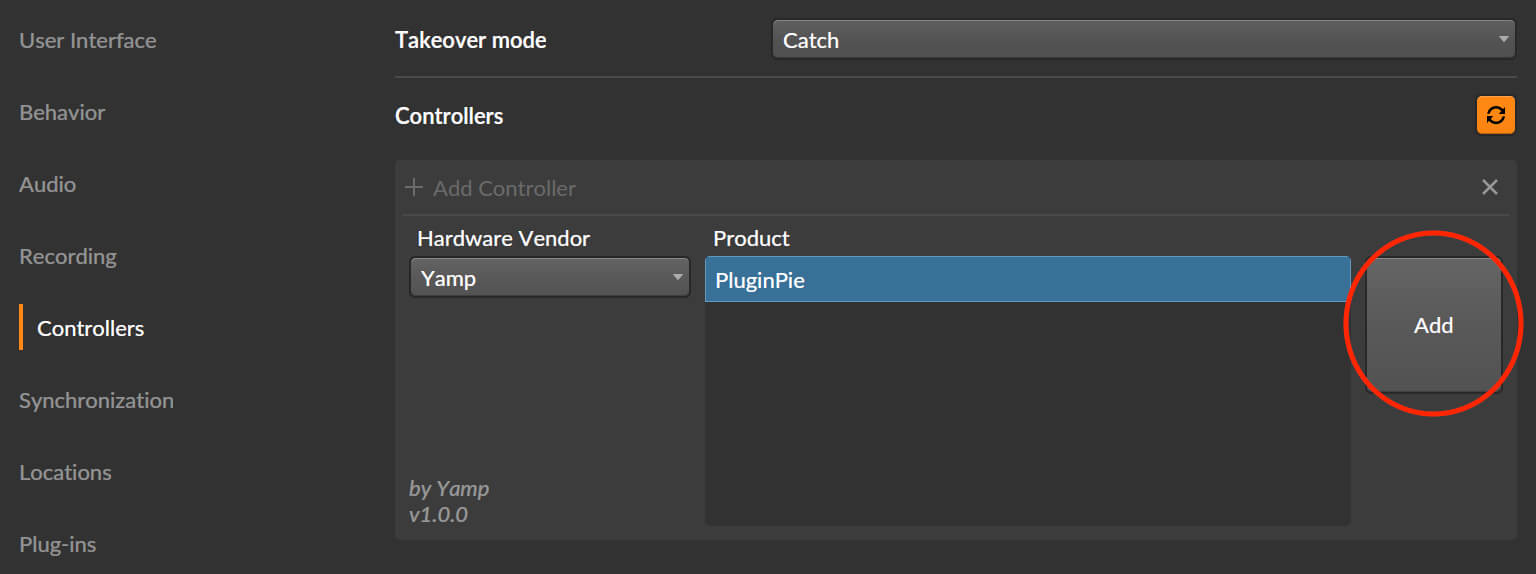
- Open Settings → Controllers.
- Choose Add Controller.
- Select Yamp as the Hardware Vendor and PluginPie as the Product, then choose Add.
Adding plug-ins
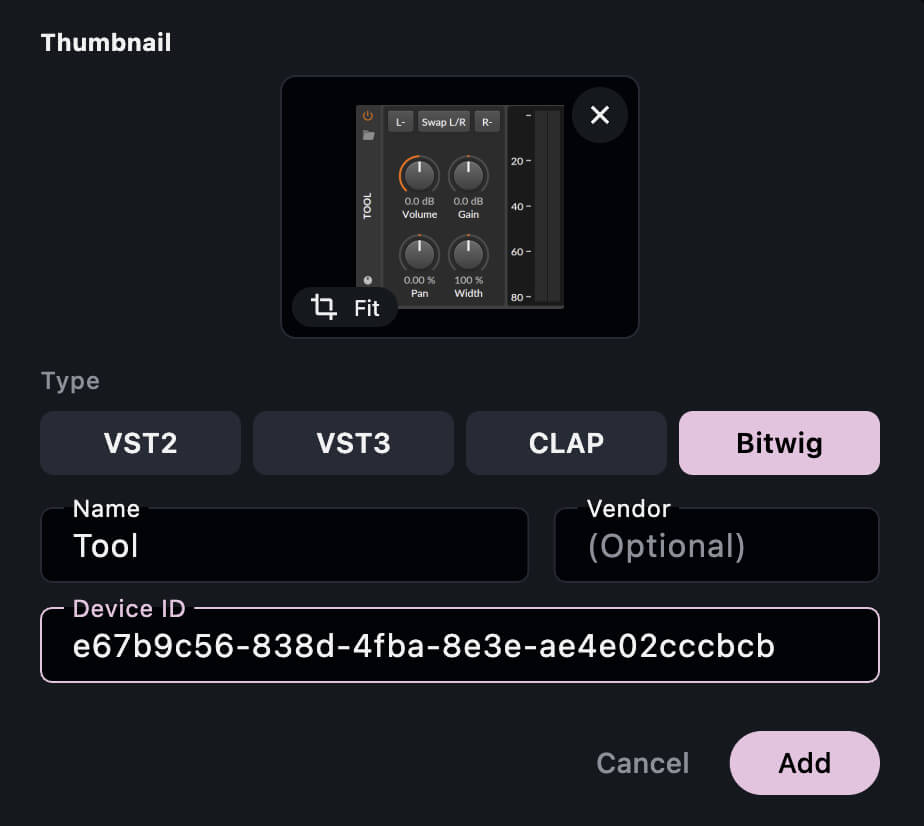
In the top-right corner of the PluginPie Editor, choose + Add Plug-in
- Select the device Type, then enter the Name and optionally Vendor.
- In Bitwig, manually load a device and then right-click it in the Device Panel. Choose Copy Device Id to Clipboard.
- Paste the copied value into Device ID, then choose Add.
Insert a device
- Select the destination track in Bitwig.
- Open your Pie and select a device.
The PluginPie app communicates with its Bitwig extension only over
localhost UDP: the default request port is 47892 and the
default reply port is 47893. No network configuration is
needed.
Troubleshooting Bitwig
“Could not reach PluginPie”
Confirm Bitwig is open and PluginPie is present and enabled under Settings → Controllers.
Copy Device Id to Clipboard is missing
Quit Bitwig and verify that config.json exists in the path below and contains exactly this line:
can-copy-device-and-param-ids : true. Save the file,
then reopen Bitwig.
| macOS |
~/Library/Application Support/Bitwig/Bitwig Studio/config.json
|
|---|---|
| Windows |
%LOCALAPPDATA%\Bitwig Studio\config.json
|
Port unavailable
In rare cases, another program may coincidentally be using the same UDP ports that PluginPie is using. To solve this you can manually specify safe unused ports.
- Quit Bitwig Studio and PluginPie.
-
Open the same
config.jsonfile used to enable the device ID command. Keep the requiredcan-copy-device-and-param-ids : trueline unchanged. -
Add these lines:
yamp-request-port : 47992
yamp-reply-port : 47993 -
Replace the example numbers with unused UDP ports from
1through65535. The request and reply ports must be different. - Save the file, then reopen Bitwig and PluginPie. The extension reads the values when Bitwig starts, and PluginPie reads and caches them on its first Bitwig insertion attempt.
The setting names and colon-separated formatting must match the
example. Duplicate, invalid, or identical port values are rejected.
To restore the defaults, remove the yamp-request-port
and yamp-reply-port lines, then restart Bitwig and
PluginPie.